Other Features for Test case Design
Multiselection for Tests
Section titled “Multiselection for Tests”The ‘Multiselection’ feature on the Tests page allows users to perform bulk actions on multiple tests, entire test suites, or folders.
To enable Multiselection:
Section titled “To enable Multiselection:”- Click the ‘Multiselection’ button located at the top left corner of the Tests page.
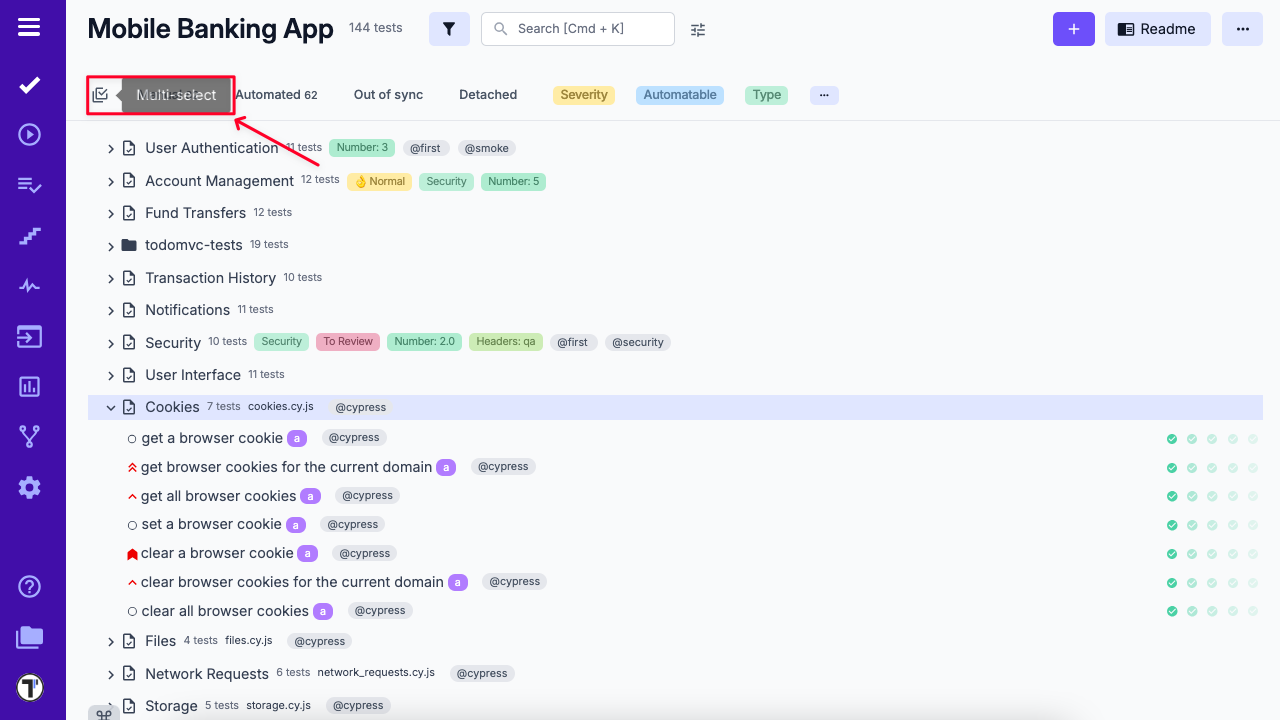
- Select the desired tests, test suites, or folders.
- Once selected, the ‘Multiselection options’ toolbar will appear at the bottom of the page.
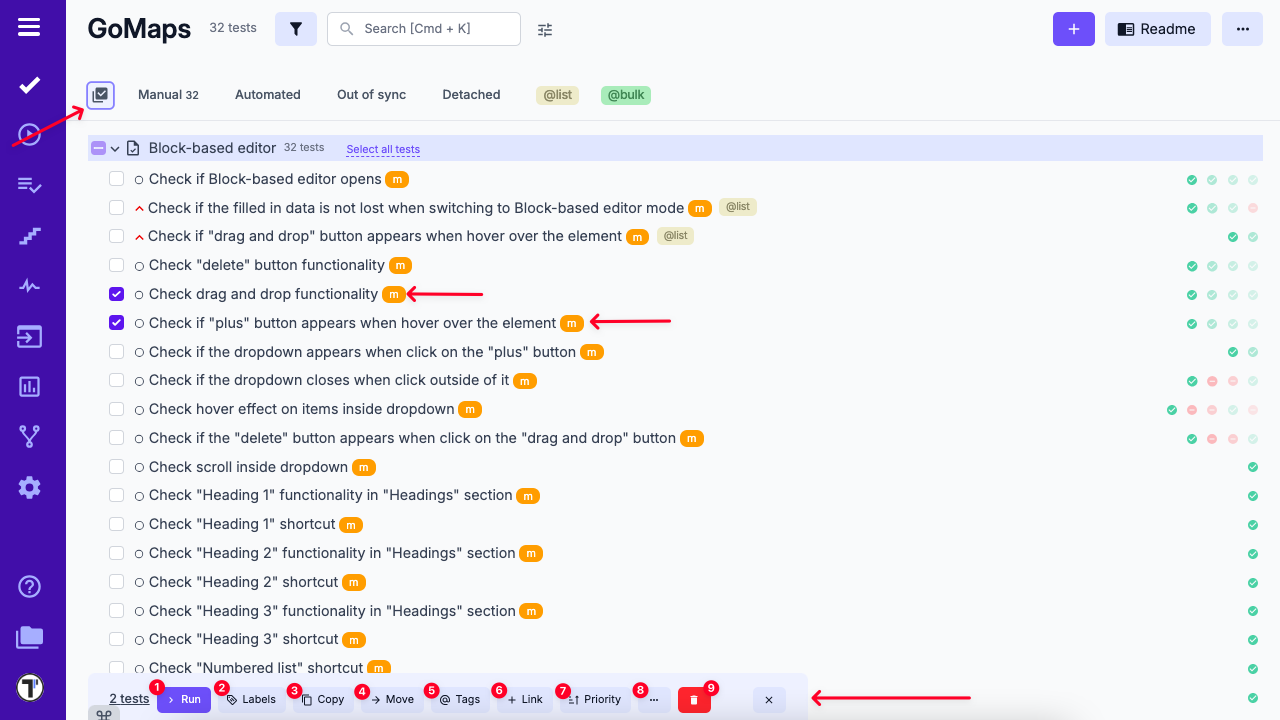
Available Multiselection Actions:
Section titled “Available Multiselection Actions:”- Run – Launches a test run containing the selected items.
- Labels – Add or remove labels or custom fields for the selected tests.
Learn more about labels → - Copy – Copy selected tests within the current project or to another project.
- Move – Move tests to another test suite or folder within the same project.
- Tags – Assign existing tags or create new ones for the selected tests.
More on using tags → - + Link – Open a pop-up to link a related defect to the selected tests.
- Priority – Set priority levels for the selected tests.
- More options (⋯) – Contains additional action ‘Download’ – Export selected tests to a spreadsheet.
- Delete – Permanently remove the selected tests.
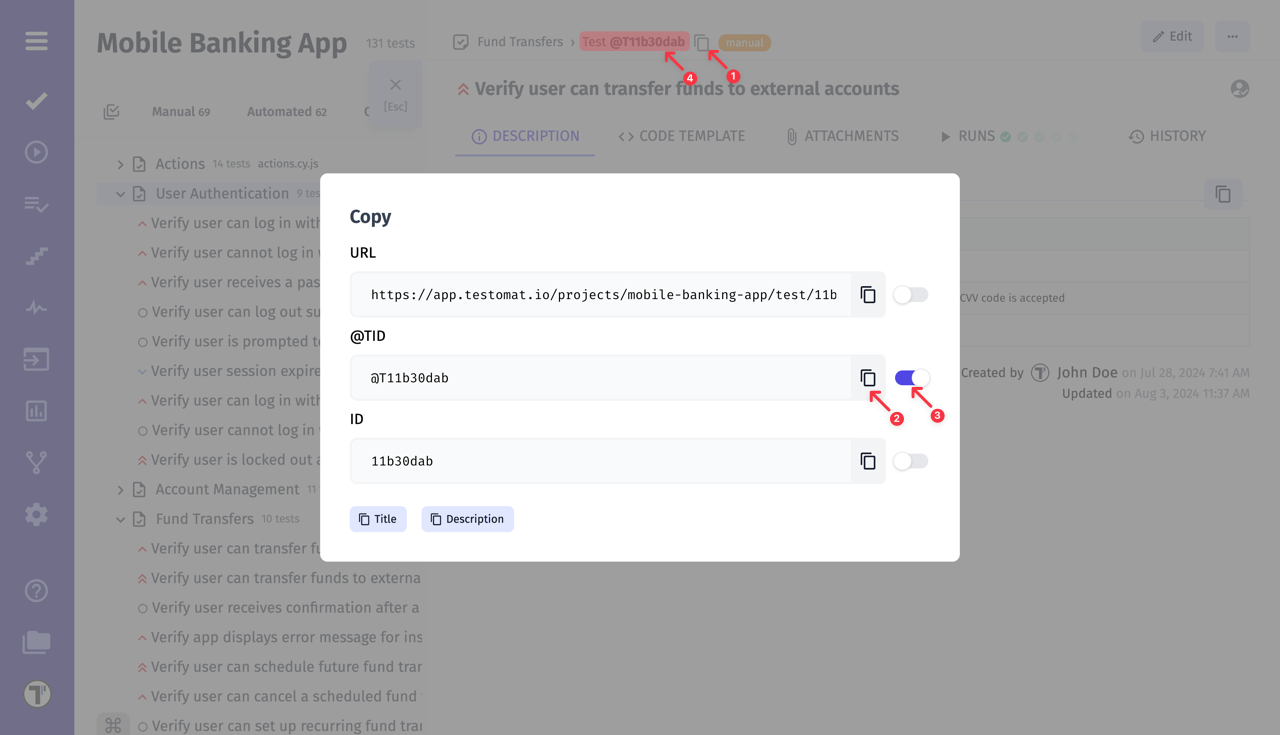
URL/ID Quick Copy
Section titled “URL/ID Quick Copy”Depending on your needs, you can set up a convenient way to copy URL/IDs in Test Cases, Suites and Runs.
To start, you need to open a Test Case (Suite or Run):
- Click the copy icon to open the modal window.
- In the window that opens, you can copy the format you are interested in.
- Turn on the toggle next to a format if you need to use it frequently.
- Now, every time you click on the ID, the selected format will be copied to clipboard without any further actions.
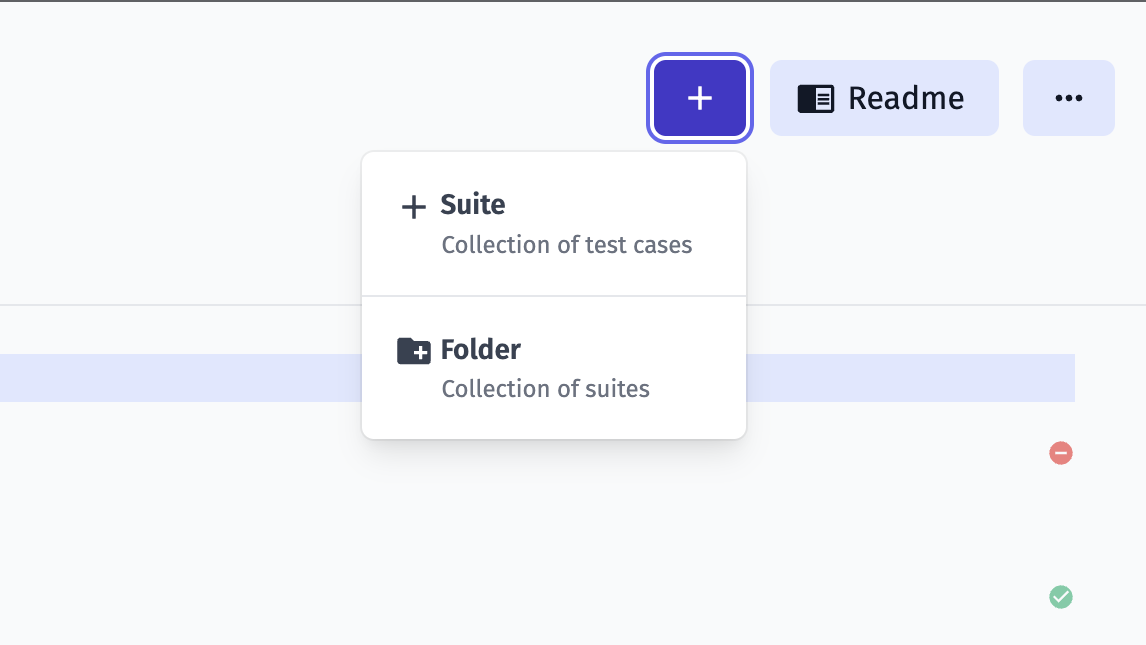
Suites and Folders
Section titled “Suites and Folders”Unlike other test management systems, Testomat.io doesn’t allow suite to include other suites and tests. That’s why you can either create a suite (a collection of tests) or folder (collection of suites).
This was designed so tests structure could match the filesystem. For instance, if you use BDD project, feature file can contain scenarios, but can’t contain other feature files. The same for automated tests, a file can contain tests but can’t contain other files.
It’s assumed that in any moment a manual test can be automated, so it is important to keep the filesystem structure in a project.
An empty suite can be converted to folder or vice versa
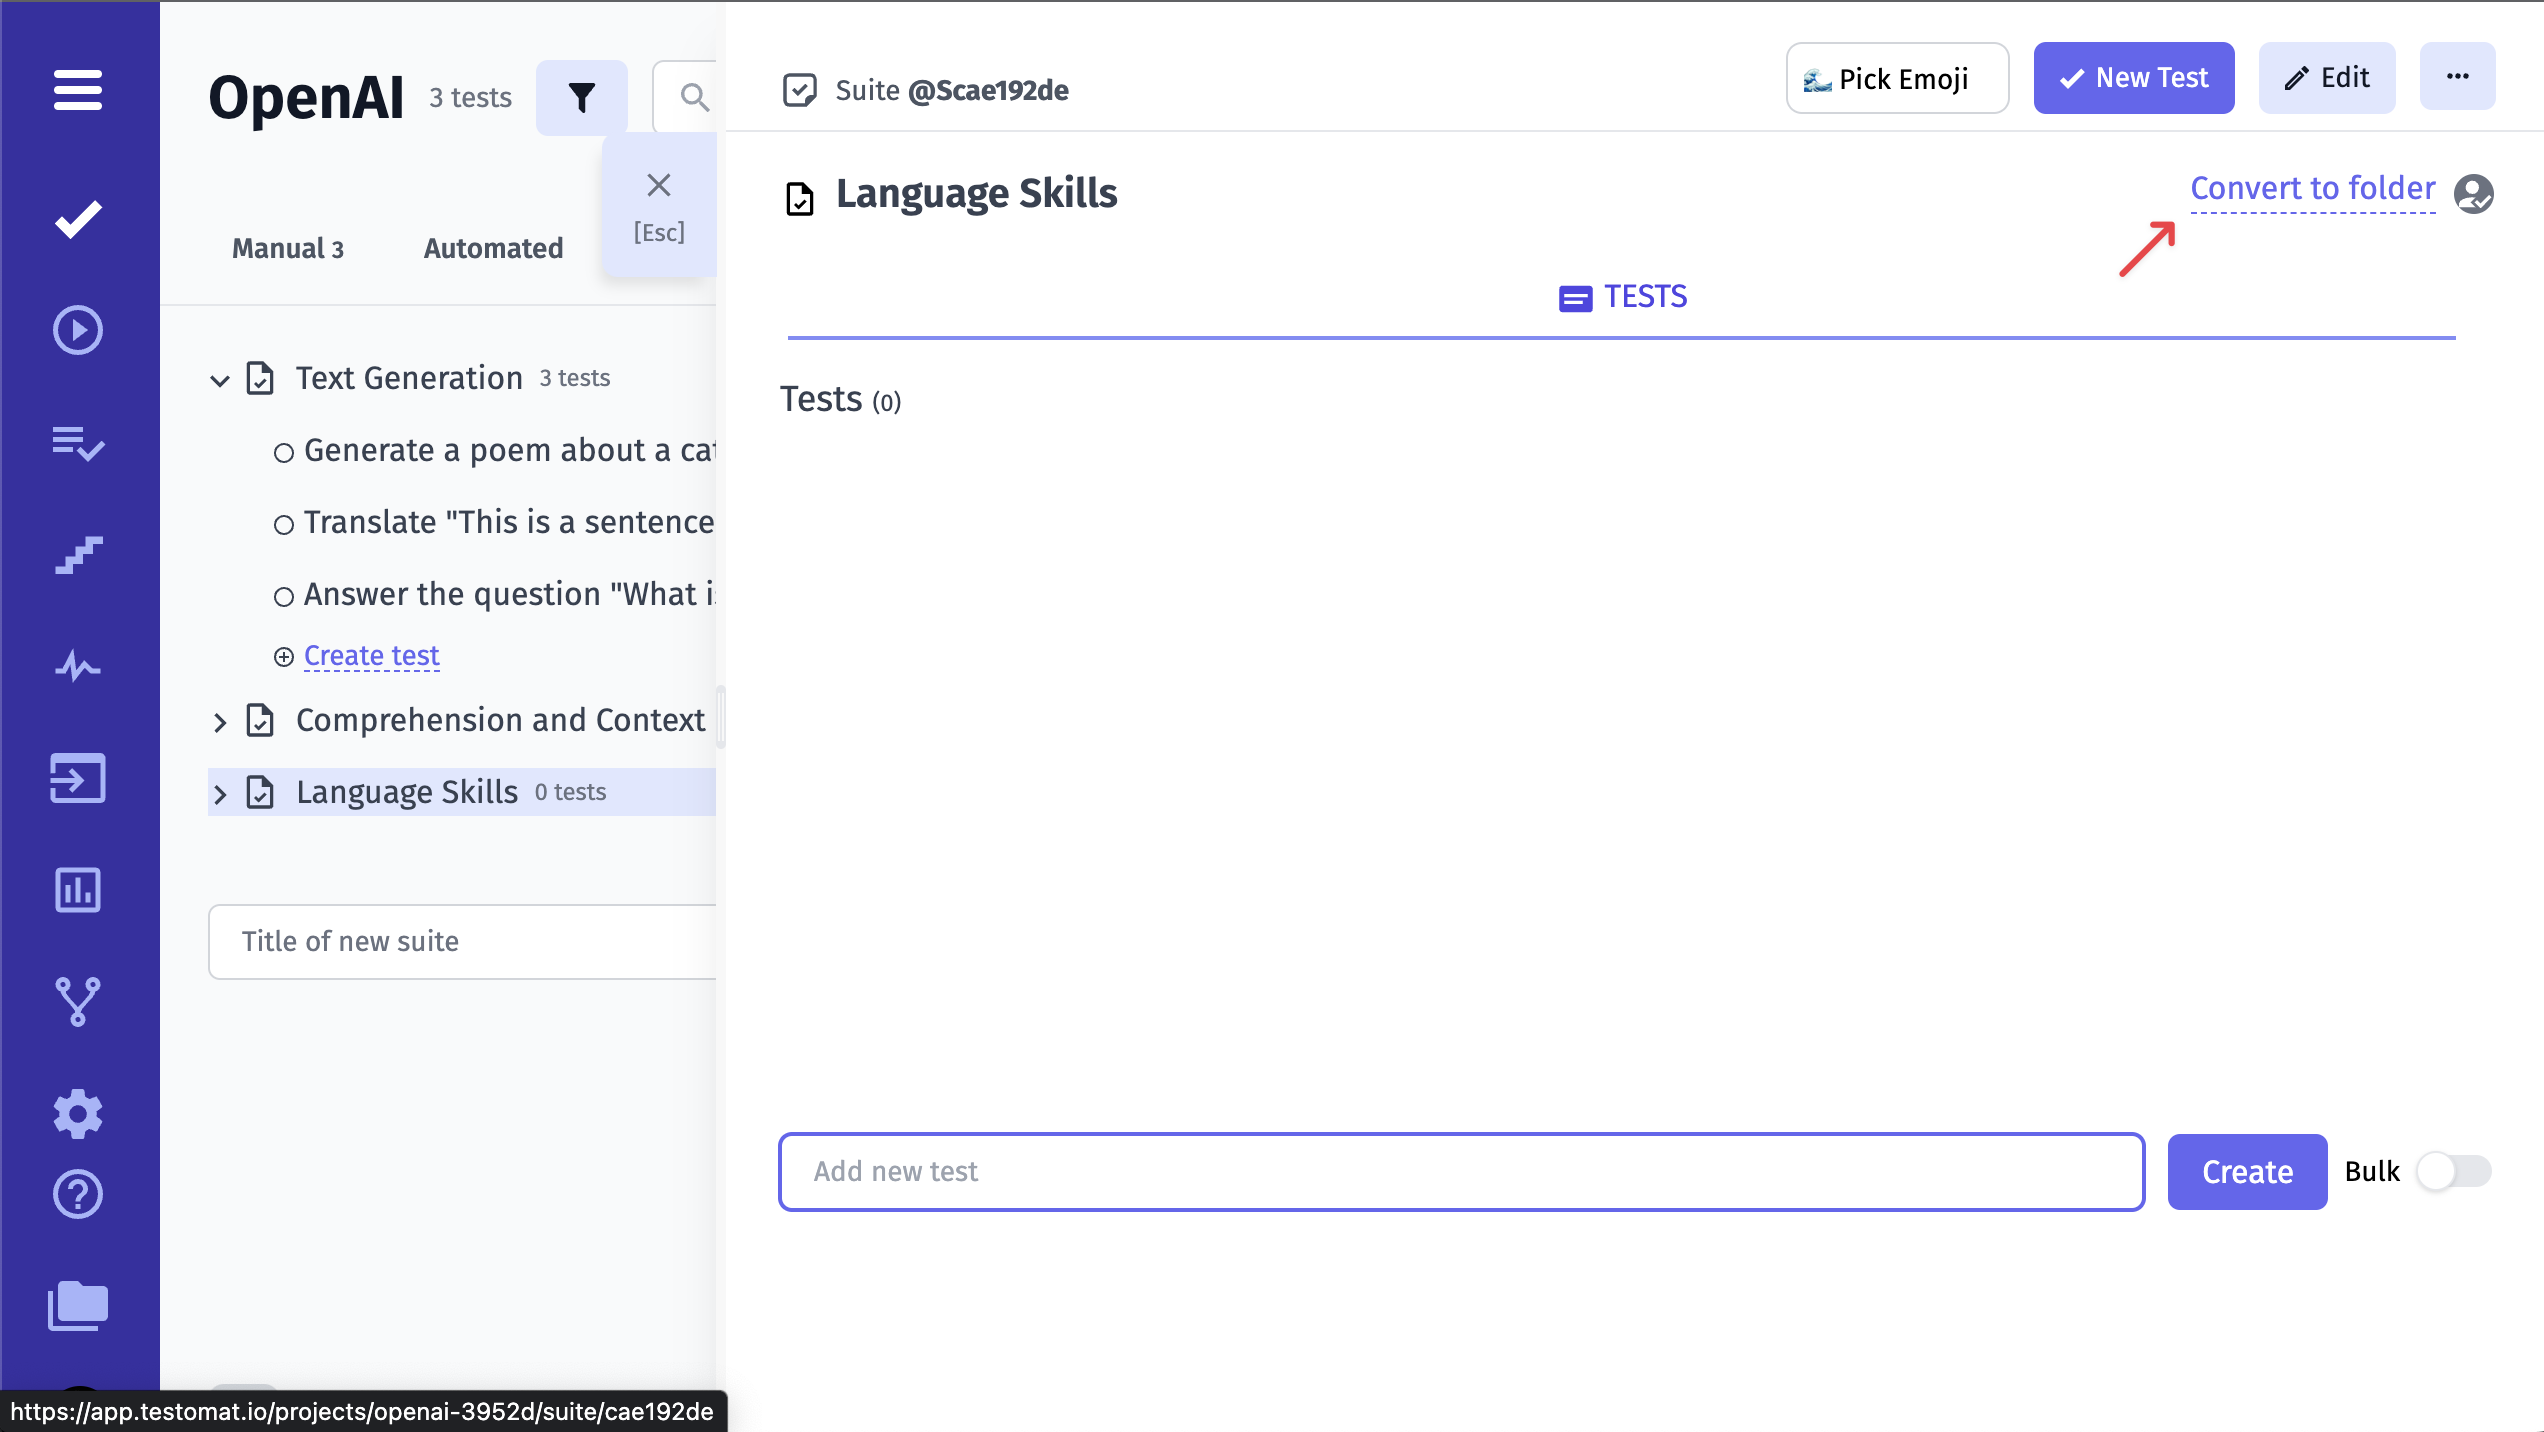
Also you can set an emoji icon for the suite

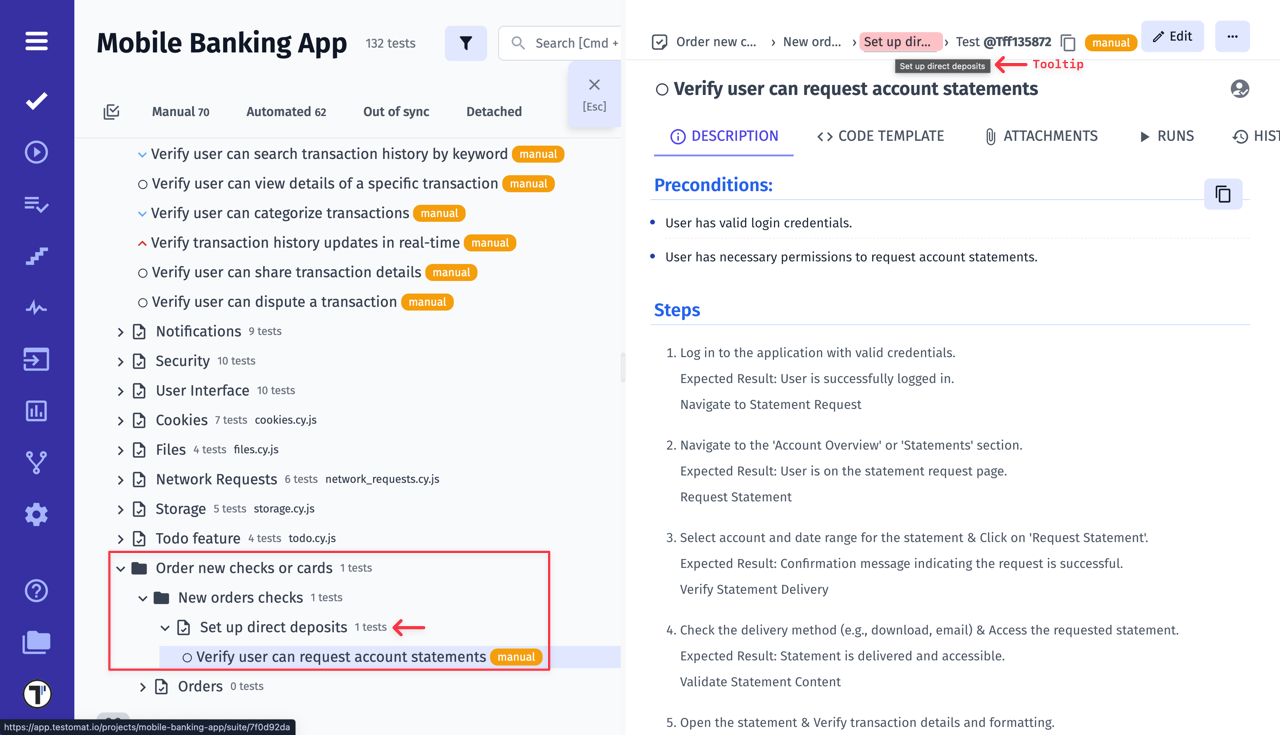
If your test is deeply nested within suites and folders, you can use breadcrumbs with tooltips to navigate the project structure more effectively.
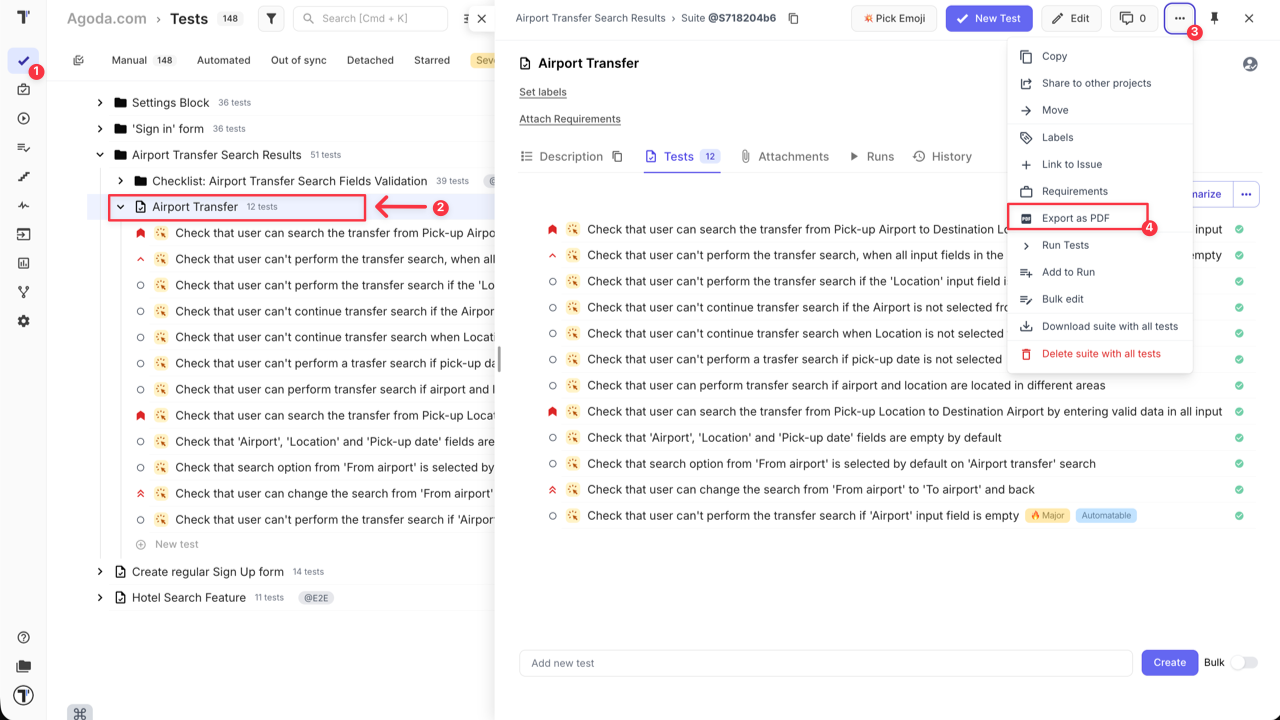
Export Suite as PDF
Section titled “Export Suite as PDF”You can now download any suite as a PDF file. This feature is designed to help teams share test results, documentation, or audit trails with stakeholders who may not have access to the platform itself.
Using this feature is simple:
- Go to the Tests page.
- Open the desired suite.
- Click ‘Extra menu’ button.
- Select ‘Export as PDF’ option from the dropdown menu.
The export captures the entire test suite, including all individual test cases, their IDs, types, steps, expected results and screenshots.
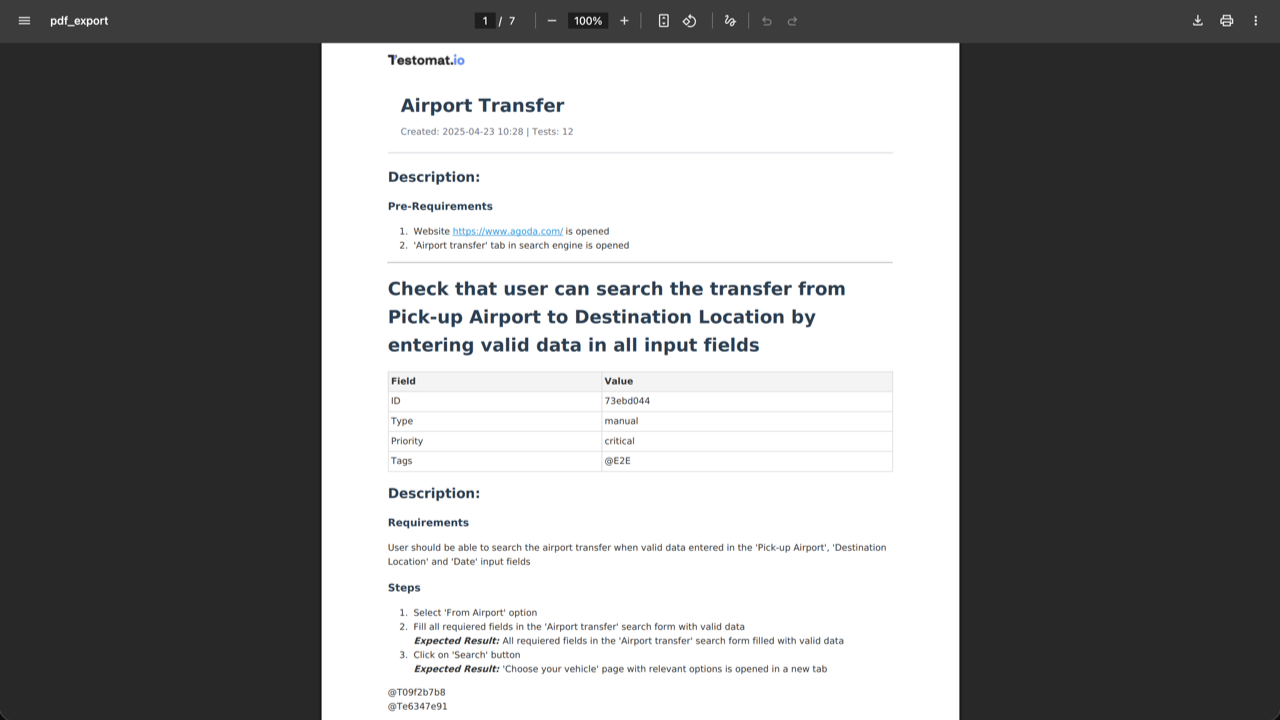
This makes it convenient to share test content outside of Testomat.io, whether for reviews, documentation, or reporting purposes.
Sharing Tests, Suites, and Folders
Section titled “Sharing Tests, Suites, and Folders”The Share feature is designed to keep test logic and structure consistent across multiple projects while keeping execution results independent.
Key principles:
- Shared items have a single source project controlling content and updates
- Shared items are read-only in target projects; editing is only possible in the source project or after unlinking
- Target projects maintain local execution context: runs, logs, statuses, results
- Items can be re-shared to additional projects without creating duplicates
- Only projects of the same type can share items (e.g., BDD → BDD, Classic → Classic)
You can share the following entities between projects:
- Test
- Suite
- Folder
Project Sharing Settings
Section titled “Project Sharing Settings”Control which users can share tests and suites:
- On: All users can share tests and suites with other projects.
- Off (default): Only Owners and Managers can share.
To change the default settings:
- Navigate to the Settings in the sidebar
- Select the Project
- Toggle On to allow access
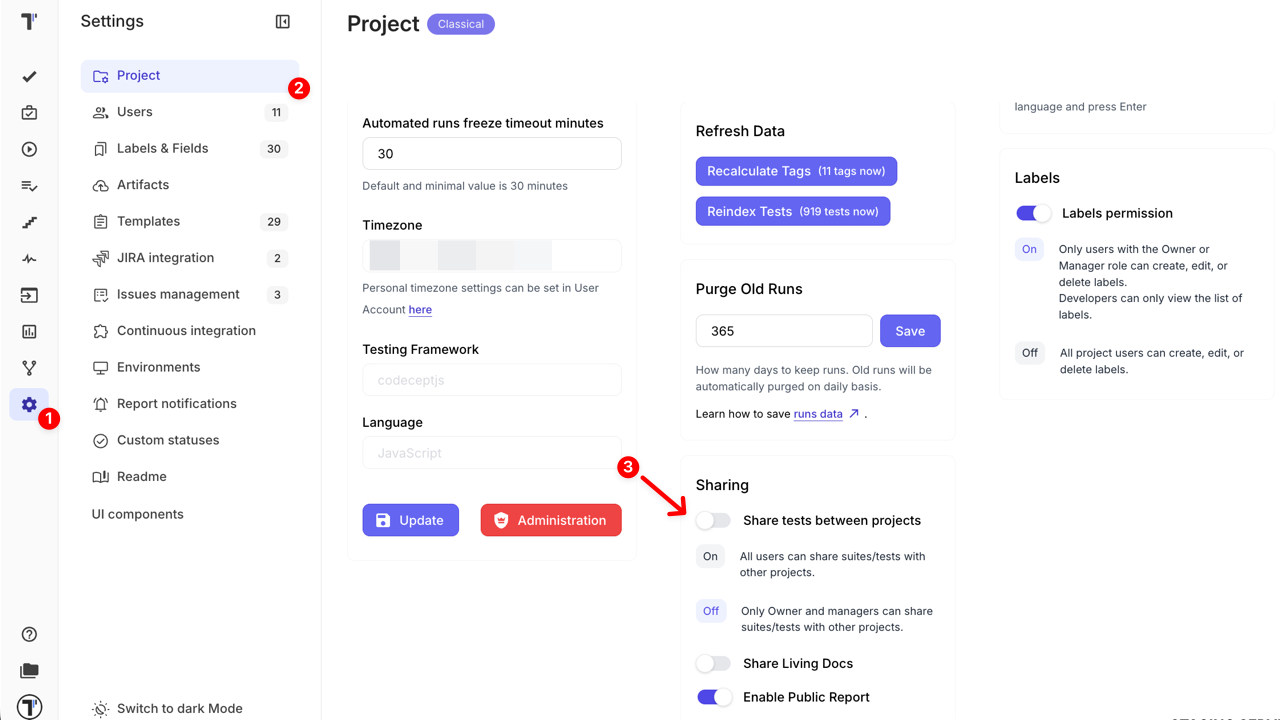
These settings apply to both initially shared and re-shared items.
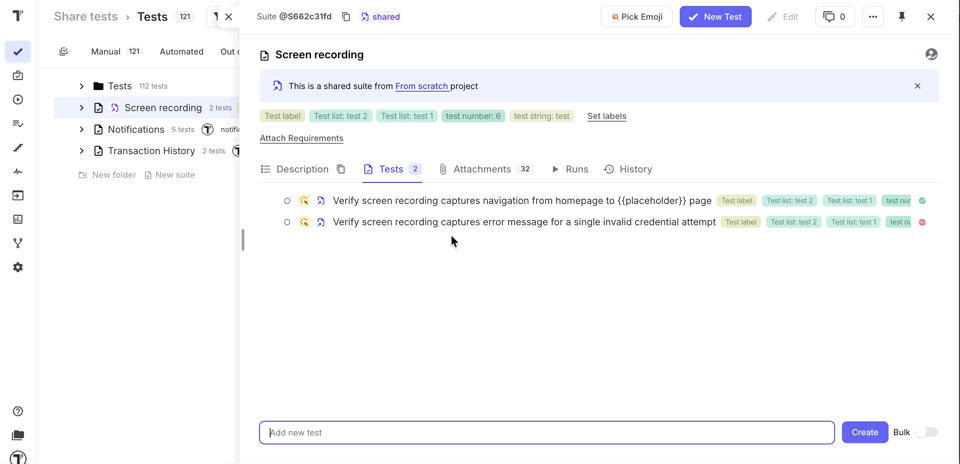
How Sharing Works
Section titled “How Sharing Works”When a test, suite, or folder is shared, specific data from the source project is propagated to all target projects, while other information remains local.
| Data | Shared Behavior |
|---|---|
| Title & Description | Shared; cannot be changed in target projects |
| Attachments | Shared; cannot be changed or new ones added in target projects |
| Labels & custom labels | Shared; additional labels can be added locally in target projects |
| Tags | Shared; cannot be changed in target projects |
| Priority | Shared; cannot be changed in target projects |
| Linked issues | Shared (if integration is enabled) |
| Assignee | Shared (if the user exists in the target project); cannot be changed in target projects |
| Test author | Shared (if the user exists in the target project) |
| Runs | Not Shared; each project reports its own results |
| History | Not Shared; always project-specific |
| Requirements | Not Shared; always project-specific |
| Comments | Not Shared; always project-specific |
Synchronization behavior
Section titled “Synchronization behavior”When an item is first shared, all data marked as Shared in the table above is propagated to target projects. After sharing is established, only a limited set of fields continues to synchronize when changes are made in the source project.
- New tests added to a shared suite in the source project automatically appear in all linked projects
- Updates to Title, Description, and Tags are synchronized from the source project after sharing
- Other shared fields are not synchronized after the initial share
Permissions and Restrictions
Section titled “Permissions and Restrictions”- Shared items are read-only in target projects
- Editing is allowed only in the source project
- Editing becomes available only after unlinking the shared item
- AI actions are disabled for for shared items
- Execution is allowed in all projects
- Execution results remain local to each project
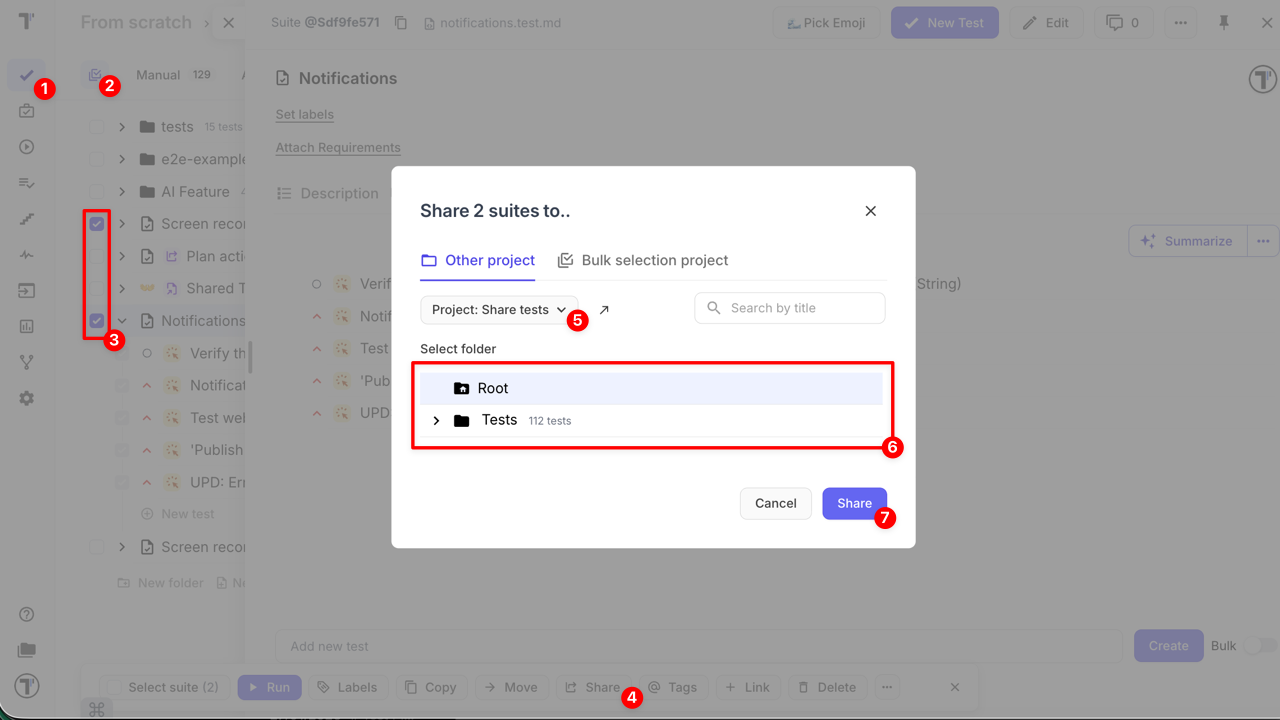
How to Share a Single Item
Section titled “How to Share a Single Item”- Navigate to the Tests page
- Open a test, suite, or folder in the source project
- Click the More options button
- Select Share to other projects
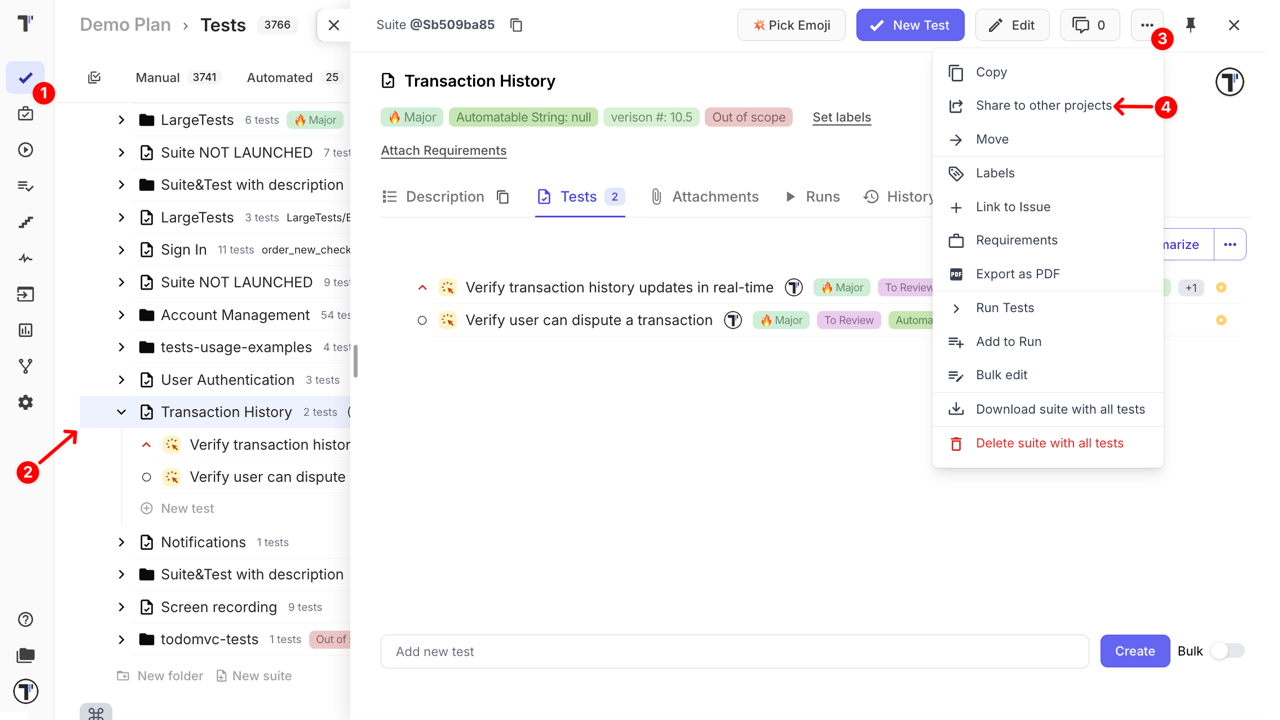
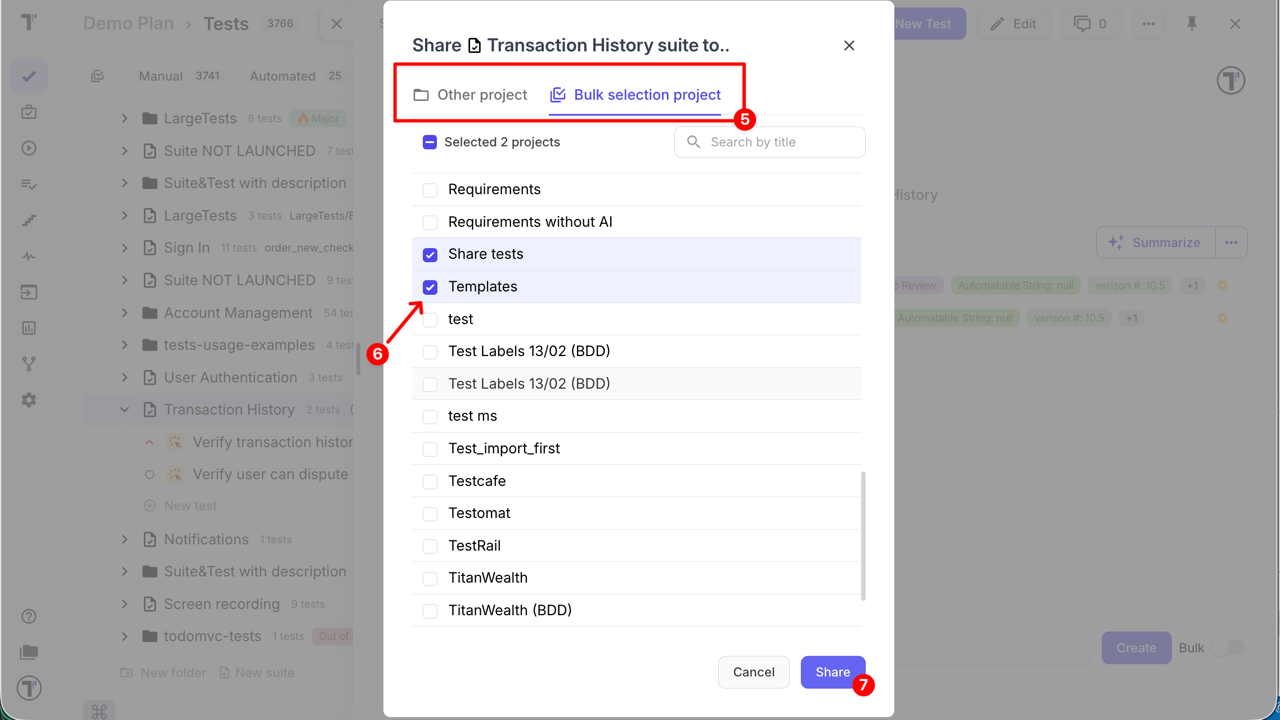
- Open the Bulk selection project tab to share with multiple projects, or stay on Other project to share with a single project
- Choose target project(s)
- Click the Share button
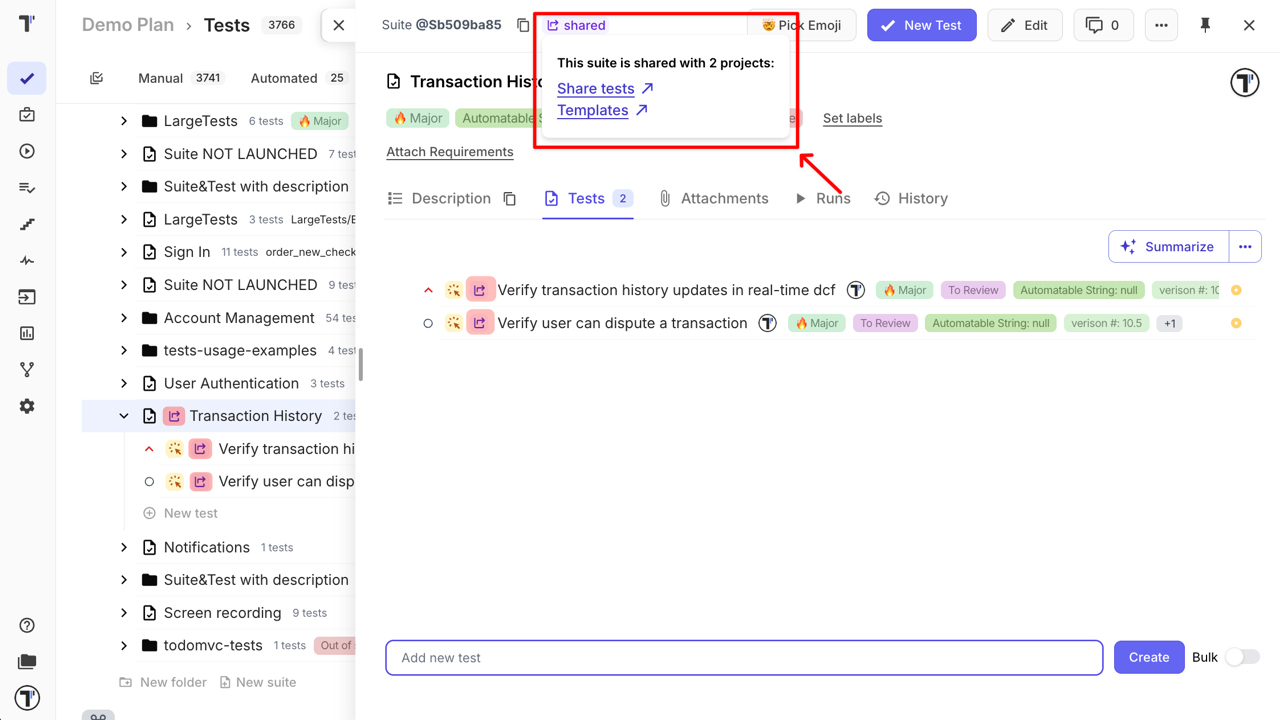
- Icons and tooltips indicating shared projects appear
- The selected items will appear in the chosen projects as shared and read-only
- Suites and folders shared in bulk are placed in the Root by default
- Sharing tests allow only for a single project
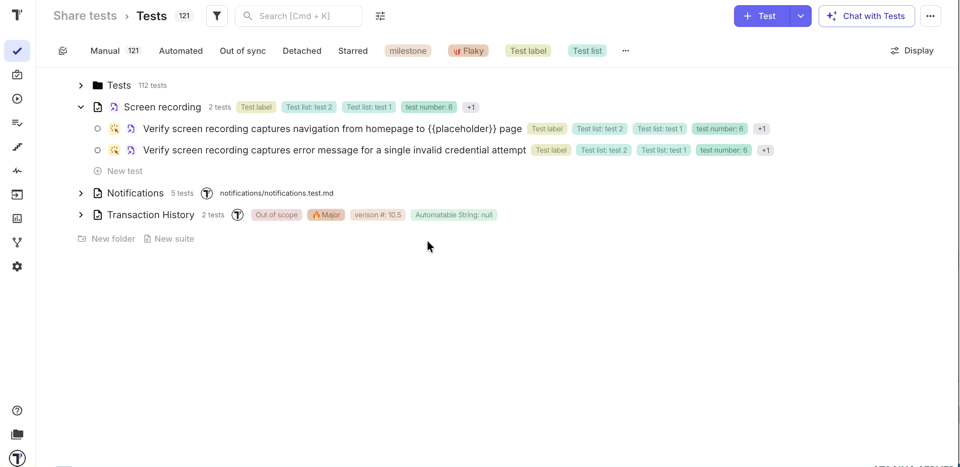
How to Share in Bulk
Section titled “How to Share in Bulk”Bulk sharing is available when multi-select mode is enabled.
- Navigate to the Tests page
- Enable Multi-select mode
- Select multiple tests, suites, or folders
- Click Share button at the toolbar
- Choose a target project(s)
- Select the destination
- Click the Share button
All selected items will be shared at once and follow the same shared rules.
How to Re-share Shared Items
Section titled “How to Re-share Shared Items”Tests and suites that were already shared to a project can be shared again to other projects.
When an item is re-shared:
- Original source remains the same (Single Source of Truth)
- Editing is still allowed only in the original source project
- For both initially shared and re-shared items, the same indicator shows the original source project
Learn more about the sharing process here.
How Execution History Works for Shared Tests
Section titled “How Execution History Works for Shared Tests”Shared tests remain linked to the source project, but execution context is always project-specific.
- Running a shared test or suite in a target project creates a local run
- Logs, statuses, and results are tracked only in that project
This ensures teams can reuse test logic while keeping execution data isolated and meaningful for each project, while still reflecting updates to the source test where relevant.
Unlinking Shared Items
Section titled “Unlinking Shared Items”Unlinking breaks the connection to the source project, making the item fully editable in the target project.
- Open the shared test, suite, or folder in the target project
- Click the More options button
- Select Unlink share button
After unlinking:
- it is no longer updated from the source project
- the Single Source of Truth relationship is removed
- the item behaves as a local project entity and can be modified freely
- a log entry appears in the History, indicating that the item was unlinked from the shared source
Use unlinking only when a test or suite must diverge from its source version.
Best Practices
Section titled “Best Practices”- Treat the source project as a Single Source of Truth
- Use shared tests for stable, reusable flows (smoke, regression, core scenarios)
- Unlink shared items only when necessary